
Aroha Ngata, Staff Writer.
You are standing in front of the bathroom mirror at 7.10am, dryer in one hand, round brush in the other, and your hair still looks like it was styled by the wind. Somewhere in a drawer there is a second dryer you bought two years ago because a video promised it would fix this. It did not. The truth, backed by most professional stylists and by the way heat and airflow actually behave on a wet hair shaft, is that the appliance rarely the problem. Technique is. A 2021 study in the International Journal of Cosmetic Science found that drying distance, airflow direction and section size affected shine and frizz far more than wattage once a dryer produced a reasonably steady heat output. This guide is about what you do with the dryer in your hand right now, not the one you might buy next.
- Section size matters more than heat setting: hair dries evenly and with more shine when sections are no wider than the diameter of your brush, regardless of dryer wattage.
- Cool air is a finishing tool, not an afterthought: a 30 to 60 second cool-shot at the end of each section helps the cuticle lie flat, which is what most people are actually chasing when they say they want ‘shine’.
- Direction of airflow along the hair shaft affects frizz more than product does: pointing the nozzle downward, from root to tip, smooths the outer cuticle layer in the same direction it naturally lies.
Why The Same Dryer Gives Different People Different Results
Two people can use an identical dryer and get opposite outcomes: one gets a smooth blow-dry, the other gets frizz and a flat crown. The dryer is a constant. What varies is technique: section size, distance from the head, angle of airflow, and how wet the hair is when drying begins.
Think of a hair dryer like an oven. A good oven does not guarantee a good loaf of bread. You still need to portion the dough correctly, place it at the right distance from the element, and know when to take it out. The appliance supplies heat; you supply the method.
Most people also start drying hair that is too wet, which forces them to hold the dryer close and hot for longer than necessary, damaging the cuticle in the process. A rough towel-dry and five minutes of air-drying before you pick up the dryer at all will shorten your styling time and reduce heat exposure.
Getting Section Size Right
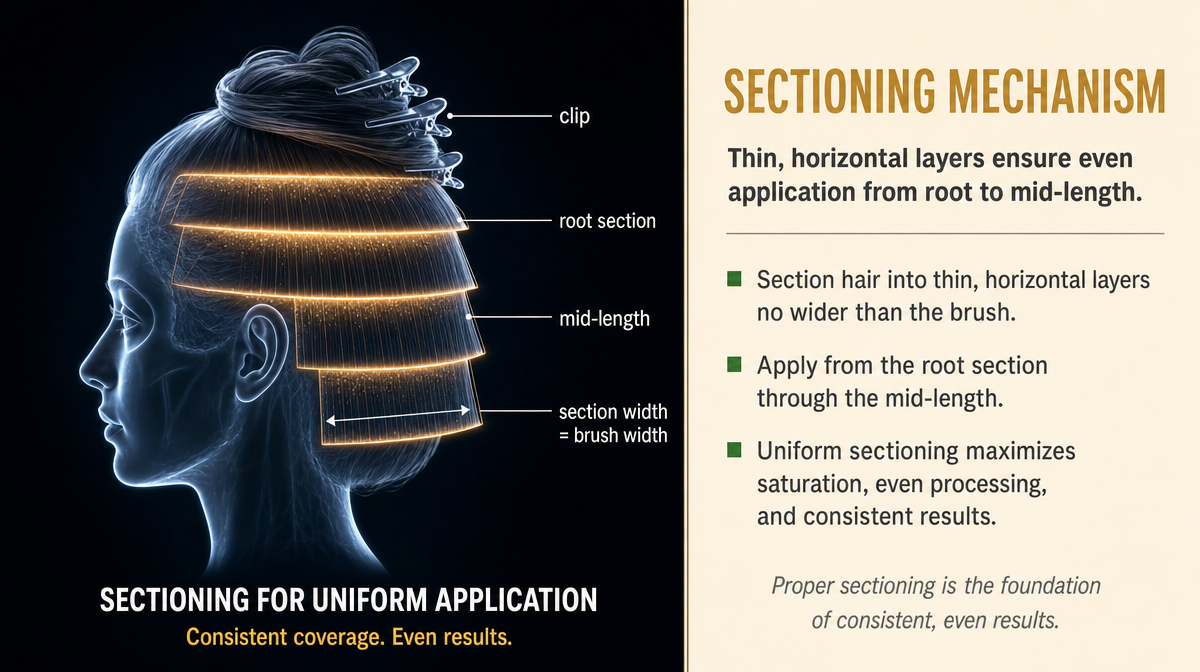
Hair dries unevenly when sections are too thick: the outer layer dries and even scorches slightly while the inner layer is still wet, which is one reason a blow-dry can look done but fall flat within an hour.
A workable rule: each section should be roughly the width of the brush or comb you are using to hold it taut. For a standard round brush that is about 2 to 3 centimetres of hair, clipped up out of the way until it is its turn.
Self-test while you read this: take a section from the back of your head and pinch it between two fingers. If you cannot easily feel dry air moving all the way through it when the dryer runs, the section is too thick. Split it in half and try again.
The mistake nearly everyone makes is impatience: grabbing a chunk of hair the size of a fist because it feels faster. It is not faster. Thick sections need more passes and more heat to actually finish drying, which cancels out the time saved.
Distance And Angle: The Physics You Are Already Fighting
Heat intensity drops sharply with distance. Doubling the distance between the nozzle and the hair roughly quarters the heat reaching the shaft, which is why professional stylists rarely hold a dryer closer than about 15 centimetres from wet hair.
Angle matters as much as distance. The outer layer of a hair strand, the cuticle, is made of overlapping scales that all point one direction, from root to tip, much like roof tiles. Airflow directed downward along the shaft smooths those scales flat, which reads visually as shine. Airflow pointed upward or held still in one spot ruffles the cuticle, scattering light instead of reflecting it, which reads as frizz or dullness.
A simple check: if your dryer has a concentrator nozzle attachment and you are not using it, that is worth changing first, before anything else in this guide. The nozzle narrows and directs airflow so you can control angle precisely, rather than blasting heat in a wide, unfocused cone.
The Cool Shot, And Why Most People Skip It
Most dryers have a cool button, and most people never touch it. That is a missed opportunity, not a cosmetic extra.
Heat opens the hair’s cuticle slightly and allows the shaft to be reshaped, whether that is straightened, curled around a brush, or simply smoothed. Cool air does the opposite: it helps the cuticle contract and set in that new shape. Skip this step and the style relaxes faster, often within an hour or two, because the shaft never fully cooled into position.
The method is straightforward. Once a section looks dry under warm air, hold the same position with the brush and switch to the cool setting for 30 to 60 seconds before releasing it. This adds a small amount of time overall but noticeably extends how long a style holds, which several consumer hair-care surveys, including reporting in New Zealand Woman’s Weekly on at-home styling habits, have identified as one of the most common complaints about home blow-drying: styles that look good for an hour and then fall.
Reading Your Results: What Shine And Frizz Actually Tell You
It helps to know what you are checking for, because ‘does it look good’ is too vague to troubleshoot with.
Shine is a function of how flat the cuticle sits, which you can assess by tilting your head under a single overhead light and looking for a continuous highlight running down the length of the hair, rather than scattered light or a dull patchiness. Frizz, particularly at the crown and hairline, usually signals that those sections were dried at too wide an angle or with the nozzle too close, puffing the cuticle rather than smoothing it.
If your ends look frayed or feel rough to the touch regardless of technique, that is more likely a cut or chemical damage issue than a drying one, and no amount of technique adjustment will fully resolve it. DermNet’s general guidance on hair shaft damage notes that mechanical and chemical damage to the cuticle is not reversible with styling changes alone, only with cutting away the damaged length or reducing further stress on the hair.
Give any technique change about a week of normal washing and drying before judging it. A single blow-dry is not a reliable test because ambient humidity and how the hair was washed both affect the outcome on any given day.
What Actually Matters Versus What Is Marketing
Wattage numbers on packaging suggest that more power means better results, but airflow volume and consistent, controllable heat matter more than peak wattage once you are above a fairly modest threshold. A dryer that surges and drops in temperature will give worse results than a lower-wattage dryer with steady output, because inconsistent heat is what actually damages hair and produces patchy drying.
Ionic technology, heavily marketed on dryer boxes, is intended to reduce static and speed drying by breaking down water droplets, but independent lab commentary, including testing summaries published by Consumer NZ on household appliances, has generally found the practical difference in everyday use to be modest compared with the effect of technique and section size.
Attachments are worth more attention than most people give them. A concentrator nozzle for directional control and a diffuser for curly or wavy hair, used correctly, will change your results more than an upgrade in wattage or a new claimed technology feature.
The honest takeaway: if your current dryer heats reliably and has a nozzle attachment, the limiting factor in your results is very likely technique, not the appliance.
A Five-minute Routine You Can Start Tomorrow
Towel-dry thoroughly and let hair air-dry, or dry on cool, until it is damp rather than dripping. This alone shortens total heat exposure.
Section hair into pieces roughly the width of your brush, clipping the rest out of the way. Start at the nape, since it is usually the most stubborn area and benefits from being dried while your arm is freshest.
Hold the dryer with the nozzle attached, about 15 centimetres from the section, angled downward from root to tip, moving it continuously rather than holding it still on one spot.
Once a section looks dry, run the cool shot over it for 30 to 60 seconds while still holding tension with the brush, then release and move to the next section.
Finish with the whole head on cool for a final 15 to 20 seconds, running your fingers lightly through to check for any damp patches near the scalp, which is the area people most often leave under-dried.
Key Takeaways
Technique outperforms wattage for most home users. Thinner sections dry more evenly than thick ones. Airflow direction, root to tip, smooths the cuticle and produces visible shine. The cool shot is not optional if you want a style to hold. Judge changes over a week, not a single dry, since humidity and wash routine both affect any single result.
Quick Checklist Before You Switch The Dryer On
- Hair towel-dried and damp, not dripping
- Concentrator nozzle attached, if you have one
- Sections no wider than your brush
- Nozzle held about 15 centimetres away, angled root to tip
- Cool shot applied to each finished section for 30 to 60 seconds
- Final full-head cool shot before checking for damp patches near the scalp
This article is general information and does not replace individualised advice from a hairdresser or dermatologist.
Results vary depending on hair type, condition and drying habits.